Cracked Top and Brace -- Need Advice on Home Repair

If you have a string instrument of any kind that needs fixing, a mistake you made in building a new instrument that you need to "disappear," or a question about the ethics of altering an older instrument, ask here. Please note that it will be much easier for us to help you decide on the best repair method if you post some pictures of the problem.
Post Reply
Mark Geoffriau
Posts: 19
Joined: Sat Aug 23, 2014 11:17 pm

Cracked Top and Brace -- Need Advice on Home Repair

Post by Mark Geoffriau »

I recently picked up a Yamaha CG101 classical on craigslist for $85. It had an obvious damage to the top, but it still played nicely so I bought it anyway. I figured with a laminated top it was probably fairly stable. It appeared to be a crack from a physical impact, not a lack of humidity.

Upon further inspection at home, I've discovered not just a superficial crack in the top, but also a crack in the brace underneath.

For reference, the area in question is circled in green here:

Image

Here's what it looks like on top. The heavy lacquer finish is obviously cracked, and the top is every so slightly displaced downward. In the 2nd and 3rd pics, you can see how the inner layer of the laminate is just barely separating at the edge of the soundhole.

Image

Image

Image

And 2 pics from inside. You can see that the downward displacement has opened a significant crack in the brace that runs across the body just above the soundhole.

Image

Image


So that's what I've got, here's my question -- what's the best way for me to attempt repairing this, keeping in mind I am not a luthier, and it's an $85 beater that I just want to experiment with?

I was planning on using either wood glue or possible some of the flexible super glue that can be brushed on. Obviously I need some way of applying pressure to close the crack as well. If at all possible, I'd like to correct the slight displacement in that area and bring it back to an even plane, but I'm not sure the best way to accomplish this.

Any and all thoughts are appreciated.
Michael Lewis
Posts: 1475
Joined: Thu Jan 12, 2012 1:22 am
Location: Northern California USA
Contact:

Re: Cracked Top and Brace -- Need Advice on Home Repair

Post by Michael Lewis »

You have two issues, one easy and the other , well, we'll see. You can glue the cracked brace with wood glue. Do not use super glue here. The more difficult issue I see is the brace looks to be separating from the top. You might try to work glue into the separation and clamp it, and hope it will hold. The proper method is to remove the brace, clean the glue surfaces, and reinstall it. Titebond will hold wood to wood very well but it won't hold wood to glue, or glue to glue. Figure out your clamping set up BEFORE you put any glue in there. Hold the guitar so gravity pulls glue to the crack.

Classical guitars have rather small sound holes, so unless you have small hands or access to some small hands (got a kid?) you will be puzzling a bit before you get this done. Think it through and do a dry run with your clamping. It is possible to tilt wedge some sticks between the back and the brace to hold the brace in place while it dries. 'C' clamps are quicker and probably easier, but put something over the surface of the top to prevent clamp marks.
Mark Geoffriau
Posts: 19
Joined: Sat Aug 23, 2014 11:17 pm

Re: Cracked Top and Brace -- Need Advice on Home Repair

Post by Mark Geoffriau »

Started the repair tonight -- attacking the separation between the brace and top first. I wedged a toothpick in there to open it up as much as I could, then used a glue syringe to put a good bead of glue along the seam. I then took a couple more toothpicks and tried to "stuff" the glue underneath the brace as much as I could. I held the guitar upside down for a couple minutes to let the glue seep under the brace, then clamped it with the craft sticks I'd already trimmed to length. The guitar is now resting propped up with the soundhole side down, and the neck angled down, to keep the glue along that seam.

I'm still worried I didn't get enough glue underneath the brace -- you can't see what you're doing while you're doing it, and I couldn't get the separation open very far. I guess if it opens up again after I remove the clamps, I'll just try again.

Any recommendations on how long I should wait before unclamping and starting the repair on the crack in the brace? Is 24 hours sufficient?

Image

Image
User avatar
Mark Swanson
Posts: 1991
Joined: Thu Jan 05, 2012 11:11 am
Location: Grand Rapids, Michigan USA
Contact:

Re: Cracked Top and Brace -- Need Advice on Home Repair

Post by Mark Swanson »

Looks like you got it good. Sure, 24 hours is good.
  • Mark Swanson, guitarist, MIMForum Staff
Mark Geoffriau
Posts: 19
Joined: Sat Aug 23, 2014 11:17 pm

Re: Cracked Top and Brace -- Need Advice on Home Repair

Post by Mark Geoffriau »

Updates!

So, things I have accomplished:

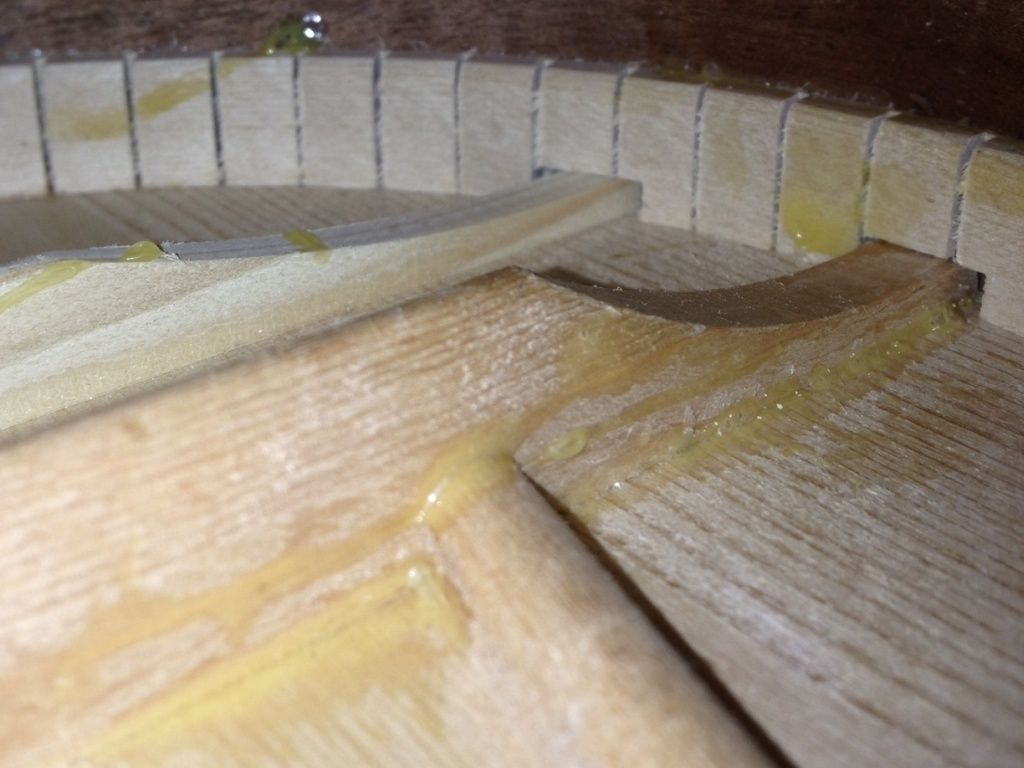
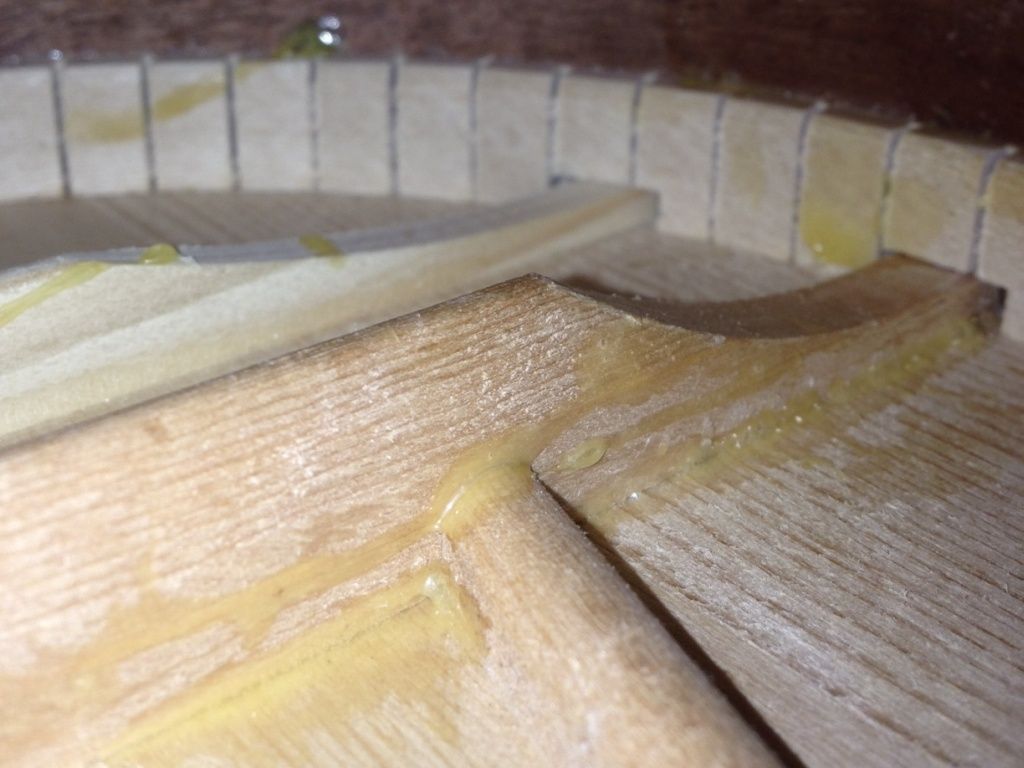
1. Gluing the brace back to the top, and then gluing the crack in the brace. I gave the glue 24 hours between each step. As you can see, I got a bit gloppy with the glue while I was repairing the crack. I will probably try to clean up the worst of the excess glue blobs, but I don't anticipate spending a lot of time on it. I did it, I learned from it, and I'll be more careful if there's a next time.

In other news, the craft stick braces worked great, but they definitely have a limited life. It's difficult to cut the notches without starting a lengthwise split in the grain, and then when you wedge them into place, the pressure makes them want to split even more. I made 3 really good ones, and they lasted for the 2 repairs, but by the time I removed them the second time, only 1 of them was still reusable. Fortunately they are cheap and easy to make.

Despite possibly using too little glue on the first half of the repair, and too much glue on the second half, everything feels solid. Hopefully it'll stay together when it's strung up to full tension.

Image

Image

2. I also fixed the little damaged piece around the soundhole (3rd pic in the 1st post). No pics of the repair, but I basically just used a toothpick to dab a bit of glue underneath the separated piece, and then clamped it shut with a small Irwin Quick Grip and two small pieces from a craft stick to protect the wood. Came out great.

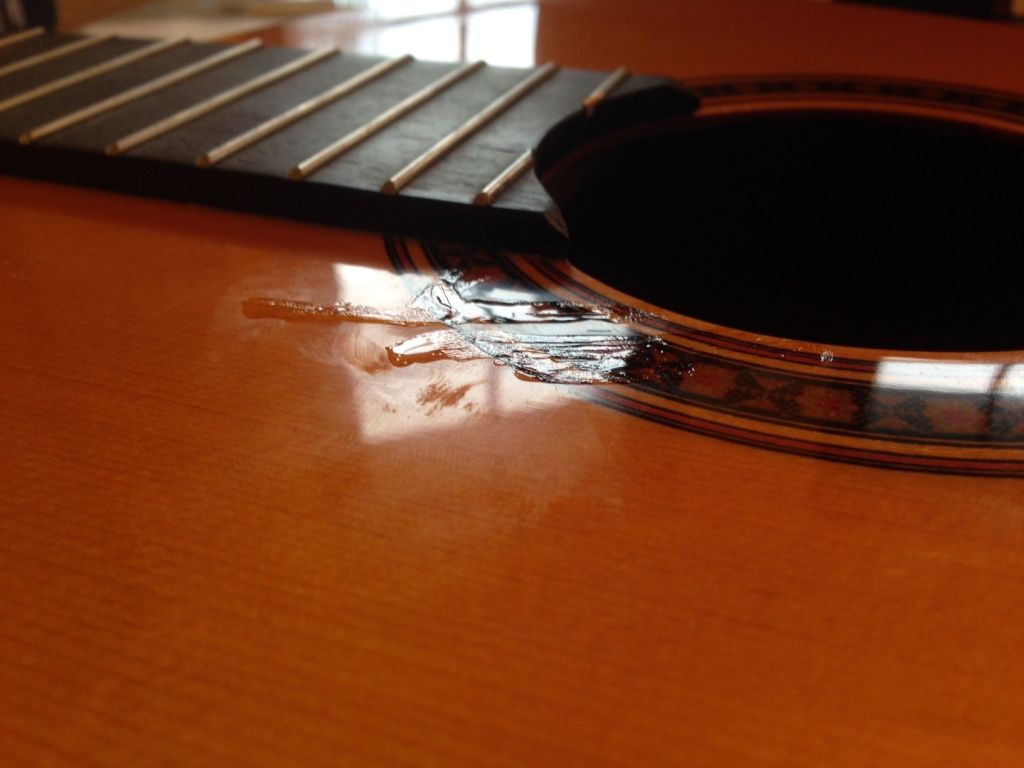
3. I decided that if this was going to be an educational project, I may as well attempt to repair the cracks in the poly finish as well. I got some clear liquid CA glue, and dabbed it over the cracked area with a toothpick. It looks pretty bad now, but I figured since I'll be wet-sanding and polishing the area down flat, it would be better to make sure every crack was completely filled. I will probably use a taped-up razor blade to scrape down the high spots before I start sanding.

Any thoughts on how long I should allow the CA glue to harden before attempting to scrape or sand it down? I have plenty of time -- my sandpaper and Micromesh probably won't arrive for 2 or 3 days.

Image

4. In between the other steps above (read: while waiting for glue to dry), I also sanded down a compensated Tusq saddle to replace the plastic Yamaha saddle. The plastic saddle was quite high and also pretty loose in the bridge. I got the Tusq saddle to slide smoothly into the bridge with just a hint of snugness, and brought it down about a millimeter lower than the Yamaha. I have some bone saddles on the way, so if the Tusq saddle ends up being too low, or I don't like the tone, I'll start over with a new one. No pics.
User avatar
Barry Daniels
Posts: 3232
Joined: Thu Jan 05, 2012 10:58 am
Location: The Woodlands, Texas

Re: Cracked Top and Brace -- Need Advice on Home Repair

Post by Barry Daniels »

You should be much more careful with the CA glue on finish. That stuff eats lacquer for lunch. It will be very difficult to even that down and make it invisible. You should apply it with a toothpick and only use it where its needed.
MIMF Staff
Mark Geoffriau
Posts: 19
Joined: Sat Aug 23, 2014 11:17 pm

Re: Cracked Top and Brace -- Need Advice on Home Repair

Post by Mark Geoffriau »

It's a poly finish, not lacquer.
User avatar
Barry Daniels
Posts: 3232
Joined: Thu Jan 05, 2012 10:58 am
Location: The Woodlands, Texas

Re: Cracked Top and Brace -- Need Advice on Home Repair

Post by Barry Daniels »

Still, need to be more careful because you just made a lot of unnecessary work for yourself. And it will be difficult to not mar the underlying finish.
MIMF Staff
Mark Fogleman
Posts: 129
Joined: Sat Apr 27, 2013 10:02 pm

Re: Cracked Top and Brace -- Need Advice on Home Repair

Post by Mark Fogleman »

You can safely scrape all but ~.005" of the CA level with a razor blade as detailed by Frank Ford here: http://www.frets.com/FretsPages/Luthier ... rape1.html
User avatar
Mark Swanson
Posts: 1991
Joined: Thu Jan 05, 2012 11:11 am
Location: Grand Rapids, Michigan USA
Contact:

Re: Cracked Top and Brace -- Need Advice on Home Repair

Post by Mark Swanson »

Agree, you have a lot of work with the razor blade there.
  • Mark Swanson, guitarist, MIMForum Staff
Joshua Levin-Epstein
Posts: 245
Joined: Sun Jan 08, 2012 7:58 am
Location: Massachusetts

Re: Cracked Top and Brace -- Need Advice on Home Repair

Post by Joshua Levin-Epstein »

You might also want to test, in an inconspicuous area (under the tuning machines comes to mind), the finish's reaction to acetone. I've run into finishes that are impervious to acetone and this would allow you to wipe off most of that glob of CA,
Mark Geoffriau
Posts: 19
Joined: Sat Aug 23, 2014 11:17 pm

Re: Cracked Top and Brace -- Need Advice on Home Repair

Post by Mark Geoffriau »

Tonight I worked on sanding and polishing down the CA-glued cracks in the top.

Surprisingly, the razor blade trick did not help at all. Even when I rolled the edge to get a tiny burr on one side, I couldn't get the edge to "grab" on the top of the CA glue...it just slid right over it. After a few attempts, I got worried that I would have to apply too much pressure to get it to scrape any glue off, so I abandoned the razor blade and moved on to the sandpaper.

I wet-sanded using 3M 220-grit, 400-grit, 800-grit, and then 1000-grit. At that point, I switched to MicroMesh and wet-sanded/polished up to 12,000-grit in several steps. This technique worked pretty well.

I had a couple problems. For one thing, if you go back to the first post, you'll see that the edges of some of these cracks are quite raised. This meant it was really difficult to get those high points leveled down without going all the way through the poly finish, and...sure enough, you can see a light spot where the poly finish wore through. The area isn't perfectly level, but I was hesitant to work the area much more than I did. To do a really top-notch job, you'd have to shoot that spot with another finish layer so that you could sand it all evenly, and that's beyond my skill/budget.

Secondly, I couldn't quite get rid of a very faint, white haze over that spot. Again, I was afraid of over-working the area, so maybe with some more polishing it might go away. If I get bold, I might try again from about midway through the MicroMesh grits and see if I can get a really clear gloss finish, but I'll probably leave it alone. It's only noticeable if you're looking for it and it catches the light just right, and after all, it is a beater guitar.

I strung up the Yamaha with some Pro Arte's this evening and I'm quite pleased with the outcome. The new tuners work great and look even better, and while the improved sound is probably 90% the result of the fresh strings, I'd like to think the repaired brace and new saddle are contributing a little bit as well.

Image

Image

Image

Anyway, I wanted to thank everyone that contributed with advice and ideas. I really enjoyed the project and have a new-found respect for luthiers.
User avatar
Barry Daniels
Posts: 3232
Joined: Thu Jan 05, 2012 10:58 am
Location: The Woodlands, Texas

Re: Cracked Top and Brace -- Need Advice on Home Repair

Post by Barry Daniels »

The razor blade scraper is a little tricky to get right. It works best for me when I really bear down when rolling the burr.
MIMF Staff
User avatar
Mark Swanson
Posts: 1991
Joined: Thu Jan 05, 2012 11:11 am
Location: Grand Rapids, Michigan USA
Contact:

Re: Cracked Top and Brace -- Need Advice on Home Repair

Post by Mark Swanson »

Part of your trouble here comes from the fact that the surface had cracked and was no longer level. When you glued it up, you didn't clamp it level as the glue dried, so when you scraped it level it took the finish down in an uneven way.
I would have used a block covered with waxed paper, and put a little glue in the crack and clamped it tightly. Then I would have scraped off any paper that stuck, and leveled the and scraped off the excess glue. it would have spread out a bit under the block but it would not have been too thick and should have been easier to scrape off.
  • Mark Swanson, guitarist, MIMForum Staff
Mark Geoffriau
Posts: 19
Joined: Sat Aug 23, 2014 11:17 pm

Re: Cracked Top and Brace -- Need Advice on Home Repair

Post by Mark Geoffriau »

Ah, yeah, that sounds like a good technique. Seems like it would force the glue into the crevices while leveling things out as much as possible. I'll have to log that one away for future use.
Michael Lewis
Posts: 1475
Joined: Thu Jan 12, 2012 1:22 am
Location: Northern California USA
Contact:

Re: Cracked Top and Brace -- Need Advice on Home Repair

Post by Michael Lewis »

One point about the razor blade as a scraper, I hold the blade perpendicular to a diamond stone and grind away for a minute or two. This removes the sharp cutting edge but leaves two sharp square edges. This way you can really bear down with the blade if necessary. Also it can be sharpened many times before it finally breaks.

I found the curled edge of the sharp razor too fragile for much of my needs, so the squared edge suits me better.

Trial and error, build the skill to use the tool.
Steven Smith
Posts: 193
Joined: Fri Jan 06, 2012 5:01 pm
Location: East Tennessee

Re: Cracked Top and Brace -- Need Advice on Home Repair

Post by Steven Smith »

Michael Lewis wrote:One point about the razor blade as a scraper, I hold the blade perpendicular to a diamond stone and grind away for a minute or two. This removes the sharp cutting edge but leaves two sharp square edges. This way you can really bear down with the blade if necessary. Also it can be sharpened many times before it finally breaks.

I found the curled edge of the sharp razor too fragile for much of my needs, so the squared edge suits me better.

Trial and error, build the skill to use the tool.
Nice tip, I use razor blades with curled edges as scrapers all the time - I'm gonna have to try this one.
Post Reply

Return to “String Instrument Repair: Practical and Political Issues”