Home made Fox Style Bender

Questions about tools and jigs you want to buy/build/modify.
User avatar
John Kingma
Posts: 213
Joined: Mon Jan 09, 2012 7:22 am
Location: N 44° 59.564 ~ W 079° 35.317
Contact:

Home made Fox Style Bender

Post by John Kingma »

My son and I are starting a couple acoustics and I was going to buy a "Fox" style bending unit... but by the time I paid for the unit and shipping to Canada then converted it all to Can$$ it was going to be over 700 bucks. So I built my own. I've got about 5 or 6 hours invested and about $225 in parts and materials (including the heat blanket). Most of the wood was shop scraps. The press screws - which are bigger than they need to be, but were the only ones I could find - came from Lee Valley.

Image

Image

Image
John Kingma,
Builder of Fine Sawdust & Expensive Kindling
User avatar
Mark Swanson
Posts: 1991
Joined: Thu Jan 05, 2012 11:11 am
Location: Grand Rapids, Michigan USA
Contact:

Re: Home made Fox Style Bender

Post by Mark Swanson »

Looks good to me. The only things I would say are that you don't need a screw press at the tailblock end, a spring-tensioned block works fine there. How are the three screw brackets held to the form? The attachments look ok for the tailblock and the waist, but the one for the cutaway may actually tear out. By the time I bend a cutaway with the wood, the blanket and two slats of spring steel, that screw needs quite a bit of pressure and I am not sure your attachments will hold in there!
  • Mark Swanson, guitarist, MIMForum Staff
User avatar
John Kingma
Posts: 213
Joined: Mon Jan 09, 2012 7:22 am
Location: N 44° 59.564 ~ W 079° 35.317
Contact:

Re: Home made Fox Style Bender

Post by John Kingma »

I'll have to take a closer look tonight, but I'm pretty sure I have enough meat in that area. Although, since this is all new to me I didn't really think about how much pressure will be required in the cutaway area.

Thanks for the heads up.
John Kingma,
Builder of Fine Sawdust & Expensive Kindling
Bob Hammond
Posts: 638
Joined: Sun Jul 22, 2012 4:13 pm

Re: Home made Fox Style Bender

Post by Bob Hammond »

I don't think that there's anything magical about storebought bending machines; they're just a convenience.

I agree with Mark that the tailblock end would work well if not better with a spring clamp arrangement, although a secure clamp at the end might not be a bad idea either. About the cutaway, I don't know.
Michael Lewis
Posts: 1475
Joined: Thu Jan 12, 2012 1:22 am
Location: Northern California USA
Contact:

Re: Home made Fox Style Bender

Post by Michael Lewis »

You have enough adjustment in the screw to allow drilling the mounting holes in the arms farther from the ends.
Stephen Neal Saqui
Posts: 188
Joined: Fri Jan 30, 2015 10:59 am
Location: Challis, Idaho
Contact:

Re: Home made Fox Style Bender

Post by Stephen Neal Saqui »

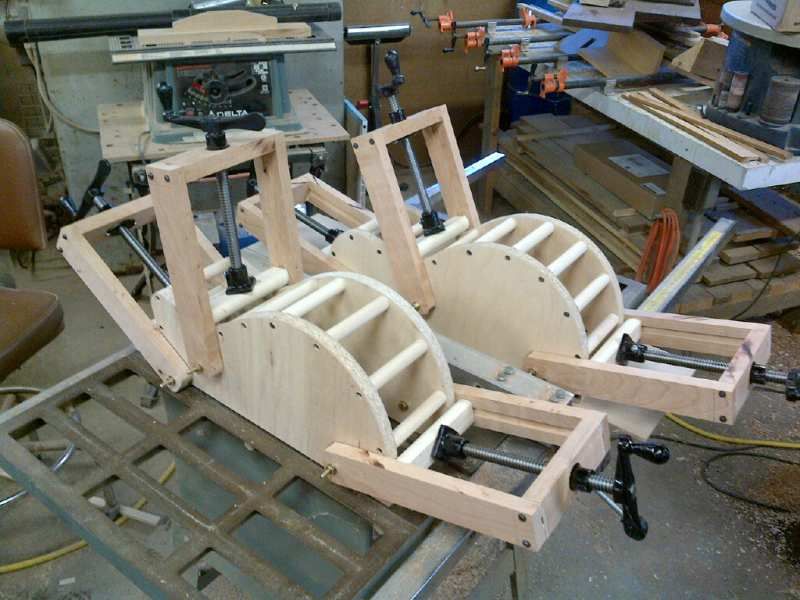
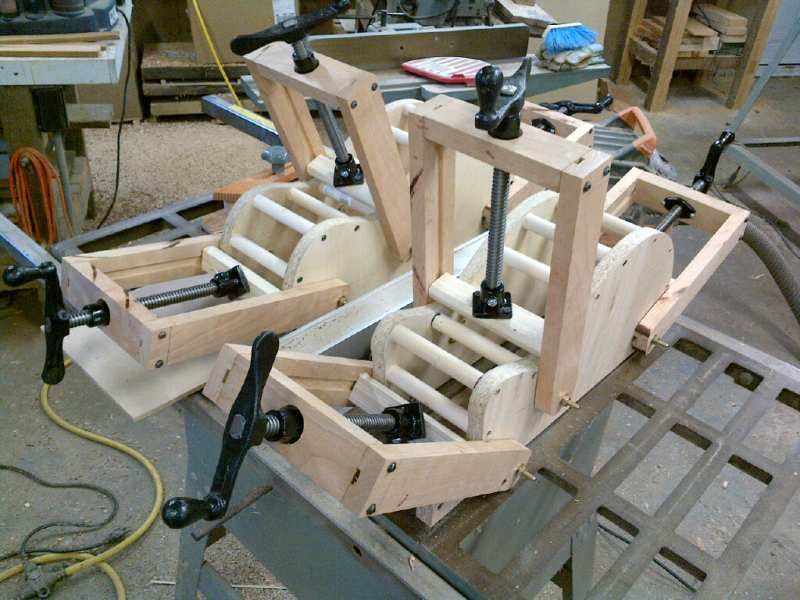
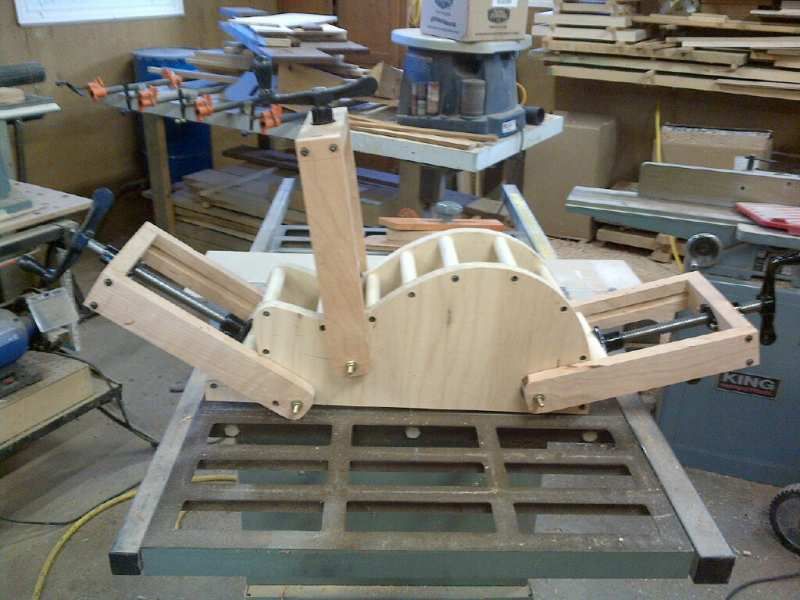
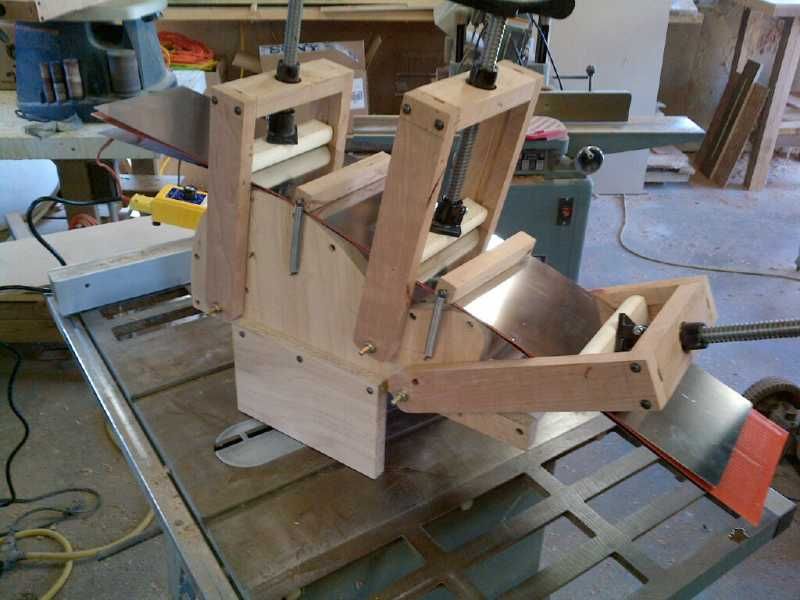
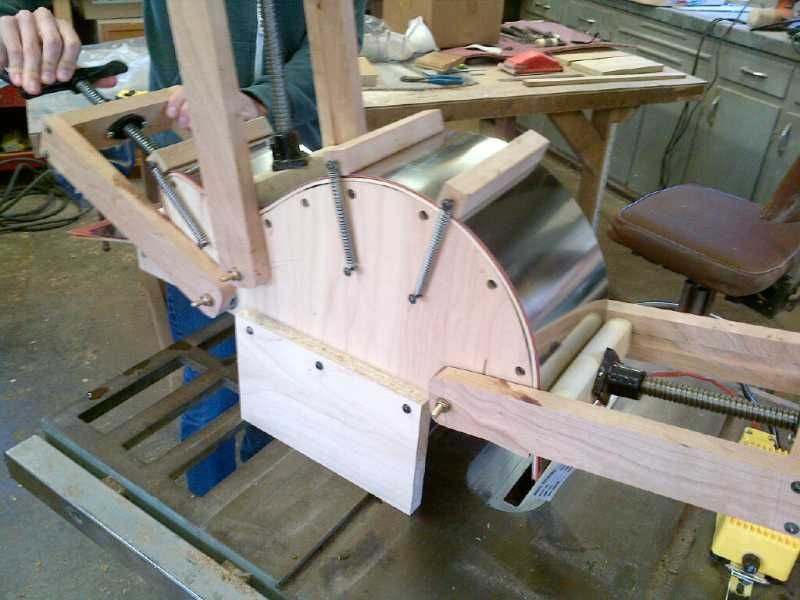
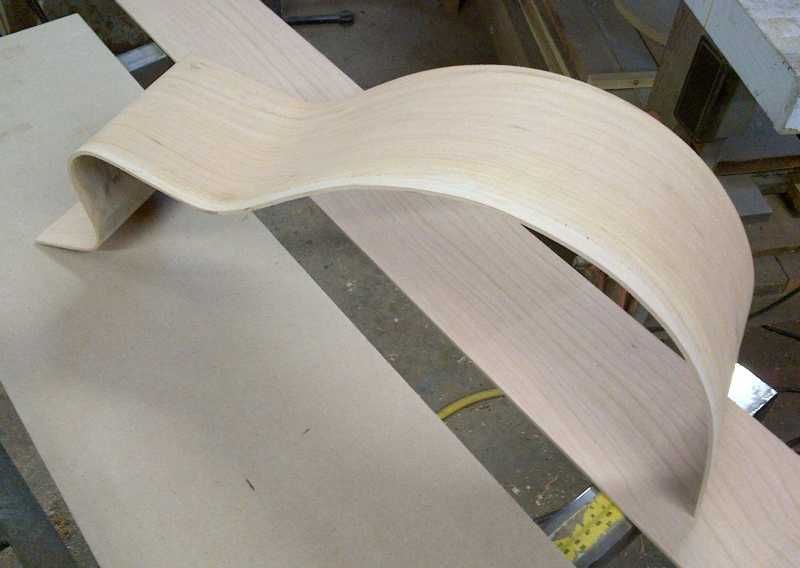
It would be a good idea to buy the plans. I think I got mine from Luthier's Mercantile. Foxe's design has you build the basic structure with the waist press, spring bars at upper and lower bouts and a channel into which you put the shape form. The shapes are separate.
The plans are very well done, clear and easy to understand. Well worth it!

I see two things that may cause disappointment. First make sure that the waist press fits the curvature of the waist of your design. Make that press 4 or 5 inches wide to assure that you don't get distortion at the waist. (The Fox design has an adjustable waist press that you easily adjust to fit the different shape forms.)

Second, the dowels should be flush with the outside of the form. It looks to me as if they're below that line. The fox design has steel "dowels" which you preheat with the Watlow blanket before bending. Here's the link to Watlow, https://www.watlow.com/products/heaters/ht_flex.cfm

Hope that helps.
Stephen
User avatar
Barry Daniels
Posts: 3254
Joined: Thu Jan 05, 2012 10:58 am
Location: The Woodlands, Texas

Re: Home made Fox Style Bender

Post by Barry Daniels »

John, you made a common mistake on the bender. The cross dowels are supposed to be exactly tangent to the guitar outline. Leaving them a little low, like you did, will not support the guitar side anywhere except the edges. This can lead to cupping. You can fix it by gluing in some strips of wood on top of the dowels to bring them up to the level of the sides.
MIMF Staff
Greg Steil
Posts: 158
Joined: Sat Jan 07, 2012 7:54 pm

Re: Home made Fox Style Bender

Post by Greg Steil »

Or by putting Aluminum flashing stock across the form....maybe?
David King
Posts: 2690
Joined: Sat Jan 07, 2012 10:01 pm
Location: Portland, OR
Contact:

Re: Home made Fox Style Bender

Post by David King »

Aluminum is a great conductor of heat but it's also reflective. I'd wonder how that would affect things. I'd probably go with a plastic that has heat handling capability. Silicone gasket or teflon will get you to 400º+.
Bob Hammond
Posts: 638
Joined: Sun Jul 22, 2012 4:13 pm

Re: Home made Fox Style Bender

Post by Bob Hammond »

Copper flashing if it's not too expensive or hard to find. Plain old thin sheet steel might be ok too.
David King
Posts: 2690
Joined: Sat Jan 07, 2012 10:01 pm
Location: Portland, OR
Contact:

Re: Home made Fox Style Bender

Post by David King »

Copper conducts even better than aluminum, garden variety steel will rust instantly when exposed to moisture and heat. It will also stain some woods like oak.
User avatar
DJ Parker
Posts: 115
Joined: Tue Feb 07, 2012 9:05 pm
Location: Jacksonville, Fl.

Re: Home made Fox Style Bender

Post by DJ Parker »

Here is my version of the side bender as shown on Sylvian Wells' site. For a minimal donation you get a lot of great tips that are well worth the price of admission. His tips and tricks are really practical and his way to taper fretboards or anything you want tapered is super.

I still need to add some feet or a short base to allow for the extra length of the sides, which I see you do not have as well. Well's design uses a timer/receptacle attached to the jig but I opted to have a dimmer/receptacle that is portable and can be used elsewhere. I didn't want to spring for LMI's heater control just yet.

I agree with everyone's comment on the rear attachment and not needing a screw clamp but it's whatever you want it to be. Note also that I build my side jigs out of several layers of MDF as opposed to the two sided with dowels or pipes approach. Again, Ford's and Chevy's.

Your jigs look good regardless. I have found that every jig is an evolutionary process that is just part of the learning curve.

Regards,
DJ
Attachments
bendingjigsm.jpg
User avatar
John Kingma
Posts: 213
Joined: Mon Jan 09, 2012 7:22 am
Location: N 44° 59.564 ~ W 079° 35.317
Contact:

Re: Home made Fox Style Bender

Post by John Kingma »

Thank you for all of the comments and suggestions.

I should have stated that these are not quite done and I still have a fair bit of tweaking to do before I am ready to use them. I will definitely take some of the advice given and make sure I have something that will work for me.

Cheers,
John Kingma,
Builder of Fine Sawdust & Expensive Kindling
Michael Lewis
Posts: 1475
Joined: Thu Jan 12, 2012 1:22 am
Location: Northern California USA
Contact:

Re: Home made Fox Style Bender

Post by Michael Lewis »

As a safety matter USE A TIMER as your ON-OFF switch. I nearly burned my shop because I got distracted and forgot to pay attention. USE A TIMER!
David King
Posts: 2690
Joined: Sat Jan 07, 2012 10:01 pm
Location: Portland, OR
Contact:

Re: Home made Fox Style Bender

Post by David King »

Something like this 60 minute bathroom fan timer?
http://www.amazon.com/Woods-59717-Decor ... B001XCWLX8
Bob Hammond
Posts: 638
Joined: Sun Jul 22, 2012 4:13 pm

Re: Home made Fox Style Bender

Post by Bob Hammond »

A safety timer is a very good idea --- >I know that's so<.

The danger isn't in the first use or the 10th use -- it's when complacency subverts vigilance.
Michael Lewis
Posts: 1475
Joined: Thu Jan 12, 2012 1:22 am
Location: Northern California USA
Contact:

Re: Home made Fox Style Bender

Post by Michael Lewis »

You can get a timer at your local hardware or electrical supply . I suggest a 15 or 30 minute timer, that way you can't set it for long enough to burn your shop down. The one I got fits in a standard switch box, so there is plenty of hardware available to trim it out, like covers, etc.
User avatar
Randolph Rhett
Posts: 349
Joined: Mon Aug 06, 2012 5:19 pm
Location: San Diego, CA
Contact:

Re: Home made Fox Style Bender

Post by Randolph Rhett »

Just one last thing: Put feet on it. It looks like the benders are sitting on the centerline of the guitar. You always bend sides that are a little long, and when you pull them down the extra length will hit whatever surface these benders are sitting on. It is nice to have them raised off the work surface a few inches.
Bob Hammond
Posts: 638
Joined: Sun Jul 22, 2012 4:13 pm

Re: Home made Fox Style Bender

Post by Bob Hammond »

This is a bit of a digression but it may be useful:

A few years back I was making some lab items from 1/4" acrylic sheet, and I needed to heat the acrylic, so as to bend it around a form. It turns out that the moldable temp for acrylic isn't far from the droopy 'taffy' temp. I scavenged a toaster oven, and then checked the temperature control, 'calibrated' the knob. I found out that the controller regulated the temperature far better than I would have ever expected. So a toaster oven might provide you several useful items: 1500 watt heating elements, and a integrated control system for temperature and time. This would replace the old-school lightbulb arrays. What might need to be discovered, is where to relocate the temperature sensor (Likely it's a thermocouple).
User avatar
John Kingma
Posts: 213
Joined: Mon Jan 09, 2012 7:22 am
Location: N 44° 59.564 ~ W 079° 35.317
Contact:

Re: Home made Fox Style Bender

Post by John Kingma »

We finally got around to doing a test bend on our machine. We used a piece of cherry left over from a desk I built for my youngest son last year. Everything went smooth and the rig worked better than I was expecting. We got a bit of "spring back" in the cutaway area, but that might be because our wood was a bit too thick. I'll have to double check before we make our next attempt. We DO have a bit of tweaking to do on the unit before we try another test. We resawed and thicknessed 4 pieces to play with. This is fun.

Image

Image

Image

.
John Kingma,
Builder of Fine Sawdust & Expensive Kindling
Post Reply

Return to “Tools and Jigs”