3 axis router build
-
- Posts: 640
- Joined: Thu Dec 27, 2012 4:28 pm
3 axis router build
I'm in the planning stages of a 3 axis router mill that will eventually become a CNC router.
It will have a build envelope of about 3' x 20" x 5"
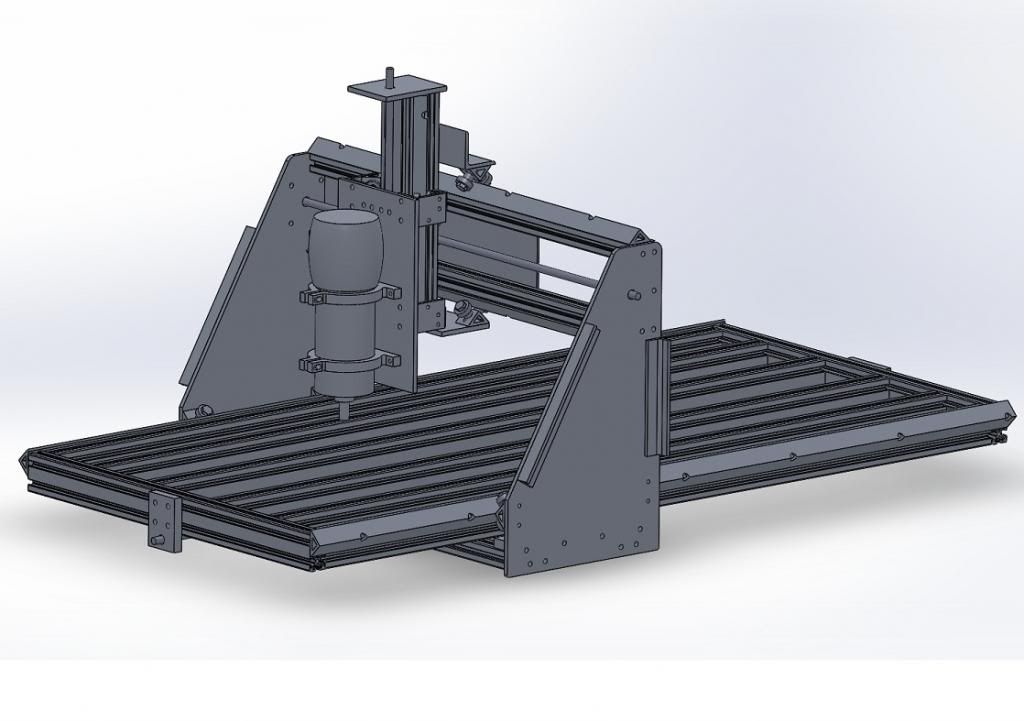
Here's the solidworks rendering of it. I'm working on drawings now and have gathered some of the aluminum plates from scrap metal at work.
It will have a build envelope of about 3' x 20" x 5"
Here's the solidworks rendering of it. I'm working on drawings now and have gathered some of the aluminum plates from scrap metal at work.
-
- Posts: 2690
- Joined: Sat Jan 07, 2012 10:01 pm
- Location: Portland, OR
- Contact:
Re: 3 axis router build
Eric,
This would be pretty useful for leveling wood or simple 2-D trace copying. How do you plan on leveling the corners? Do you have access to a machinist's level?
Do you have a mechanism for locking each axis independently so that you only have to worry about controlling movement on one axis in "manual" operation?
I've been thinking about the practicality of building such a machine with simple G-code interface to automate some basic routines.
Lucky you having access to a nifty CAD program.
-
- Posts: 640
- Joined: Thu Dec 27, 2012 4:28 pm
Re: 3 axis router build
I've only put a little thought into locking down an individual axis at this point. So far all I have for a level is a basic bubble but I may have to borrow something when I get done. I've got a nice counter top that I can tie this down to when it is finished.
Fortunately I have access to a mill and a router at work so I can do some very precise drilling of the holes using minimal bolt clearances and still have things line up nicely.
I have all of my 1/2" pieces and the 1/4" piece for the router mount. I need some bigger 1/4" plates for the side uprights of the gantry and to buy the 8020 pieces. I have some UHMW already to make the bearings.
- Andy Birko
- Posts: 125
- Joined: Fri Jan 06, 2012 5:02 pm
- Location: Rochester Hills, MI
- Contact:
Re: 3 axis router build
1/4" plate for the uprights will probably be quite flexy. Might think about at least bolting some angles on there to stiffen it up.
If you plan on going full CNC in the future, you'll probably want to re-think your design. UHMW bearings pretty much aren't used at all by the DIY CNC crowd and there's probably a very good reason for it. That reason probably being that if you get them tight enough for good cuts there's too much friction.
If you haven't already, you might want to look around on cnczone.com in the wood router section. There's a lot of information regarding DIY CNC machines there. You can also post your design there for input as well but, be prepared for some criticism!
Good luck!
PMoMC
-
- Posts: 65
- Joined: Sat Jan 07, 2012 9:13 pm
- Location: wisconsin
Re: 3 axis router build
Eric,
Andy offers great advise. CNC zone is a great outlet, a bit intimidated for the novice. I just recently finished up a three axis router. Definitely build this thing heavy. Linear guides and rails for sure, I doubled up on 35mm sets. Very rigid. 8020 works but select the material carefully as they sell various series. Light weight, is hollow webbed, you want to use solid web. 40 and 80 mm. would be a good choice. I assume you will use stepper motors versus servo units. When you check the cost and technology needed for both you will understand why I say this. Stepper motors will hold tight when not being told to drive. My advice would to buy a drive package set up from a reputable supplier, I did just that, worked out of the box flawlessly. Came bundled with all needed software to get you started nicely. Truly plug and play. These things take there own skill set for sure but very manageable. Think carefully about your basic design concept, built it to light,
you will fight it forever. Put the money into the heavy guides and good ball screws and nuts. Build around that and you will be fine.
Have fun..........
-
- Posts: 640
- Joined: Thu Dec 27, 2012 4:28 pm
Re: 3 axis router build
i have some 1/2" aluminum plate for cross bracing on the gantry to stabilize things. i' ll use it as a manual mill first to get an idea of it though
-
- Posts: 640
- Joined: Thu Dec 27, 2012 4:28 pm
Re: 3 axis router build
I'd done a bit of research on the UHMW slides too and that's what I had seen mostly but thought I'd try it based on a couple of projects where it seemed to work. I think I'll go with the skate bearings instead now. similar to on www.buildyourcnc.com
I can use some of the 8020 angle gusset extrusion to hold the angles in place.
-
- Posts: 640
- Joined: Thu Dec 27, 2012 4:28 pm
Re: 3 axis router build
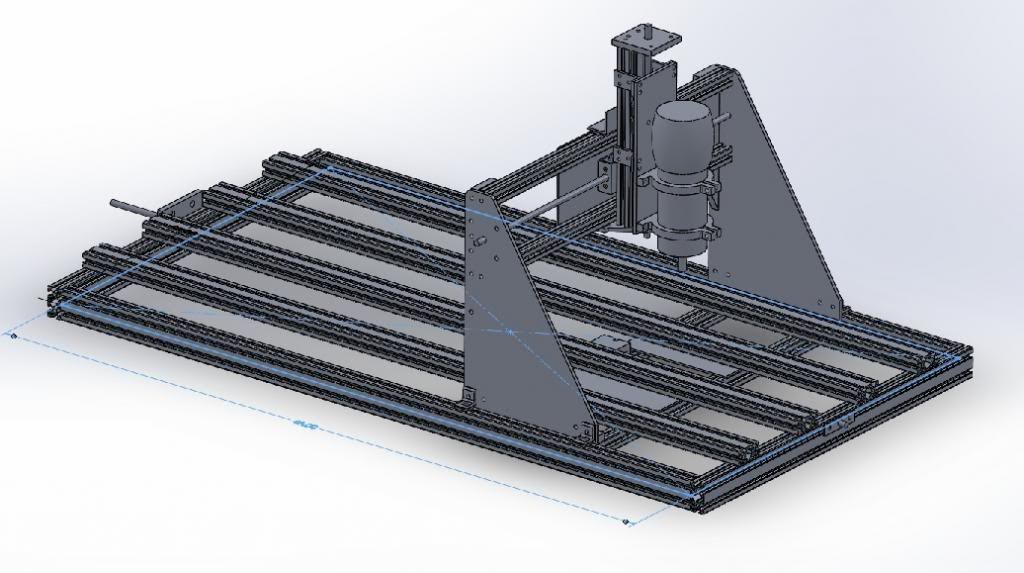
here's an updated rendering with the 8020 angle extrusion as a bearing rail and skate bearings. I also moved the gantry rail to outside of the platform so I will have to add some legs to the corners. Hopefully the 25-2550 is sufficient for support or I'll have to swap out that piece for a taller extrusion.
-
- Posts: 2690
- Joined: Sat Jan 07, 2012 10:01 pm
- Location: Portland, OR
- Contact:
Re: 3 axis router build
What about a stationary gantry and moving table? I.e. move the piano bench, not the piano. I suppose there's a good chance the table could have more mass than the router.
It makes me wonder why they don't let the big CNC bedmills float so that all the inertias balance out. As the gantry moves one way the bed/ table is headed in the other to keep the center of mass stationary. With rapid starts and stops you wouldn't have the whole thing jerking back and forth. I bet it would run quieter and not wear out as quickly.
-
- Posts: 640
- Joined: Thu Dec 27, 2012 4:28 pm
Re: 3 axis router build
That was my original thought but that takes up a lot more space in the shop to operate. (almost twice as much)
Plus the gantry will weigh less then the table with workpieces
-
- Posts: 640
- Joined: Thu Dec 27, 2012 4:28 pm
Re: 3 axis router build
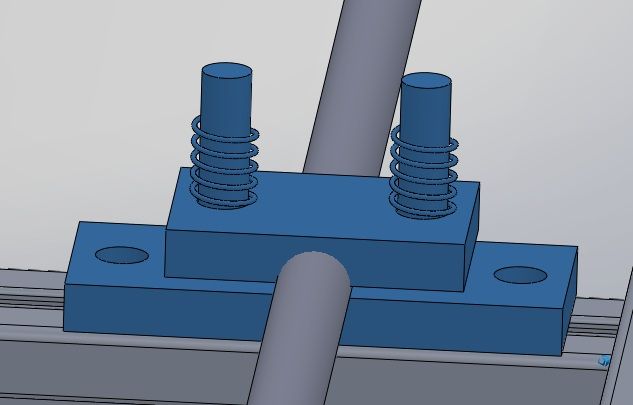
heres my thought on an anti-backlash device. It is 2 pieces of either brass or UHMW. I'll put a spacer between them and drill/tap a hole. Then hold the plates together with a couple of studs/springs to provide a clamping force on the threaded rod. I have almost all of the material if I do this out of UHMW so it is pretty much free other then my time.
-
- Posts: 2690
- Joined: Sat Jan 07, 2012 10:01 pm
- Location: Portland, OR
- Contact:
Re: 3 axis router build
That's quite different from the classic anti-backlash which is just two nuts that are pre-loaded to push towards or away from each other.
-
- Posts: 640
- Joined: Thu Dec 27, 2012 4:28 pm
Re: 3 axis router build
There are other methods out there similar. A useful test though I'd say. very replaceable wear parts.
-
- Posts: 2690
- Joined: Sat Jan 07, 2012 10:01 pm
- Location: Portland, OR
- Contact:
Re: 3 axis router build
You could combine both methods and reap the benefits of both.
Screw cutting lathes use "1/2-nuts" that clamp down on an acme threaded rod. It allows rapid repositioning of the apron. Unfortunately acme threads don't have enough profile angle to tighten up backlash with the squeeze system.
Most threaded rod isn't very straight. I'd love to know how to go about straightening it or any shafting. That's the main benefit of the rolled-thread ball screws.
-
- Posts: 640
- Joined: Thu Dec 27, 2012 4:28 pm
Re: 3 axis router build
I'm using 3/8-16 threaded rod to start with. I'll probably upgrade to the acme rod eventually.
-
- Posts: 2690
- Joined: Sat Jan 07, 2012 10:01 pm
- Location: Portland, OR
- Contact:
Re: 3 axis router build
That sounds smallish, the last CNC conversion project I was involved with used 1" ball screws but that was a bridgeport sized mill. Are 3/8" rods typical for this size router? Acme threaded rod is very inexpensive so the differential between 3/8 and 1/2 would be all of a few dollars.
-
- Posts: 640
- Joined: Thu Dec 27, 2012 4:28 pm
Re: 3 axis router build
it looks like it costs quite a bit more for the acme rod then regular threaded rod. it's easy enough to change it later with the 8020 setup later though.
- Andy Birko
- Posts: 125
- Joined: Fri Jan 06, 2012 5:02 pm
- Location: Rochester Hills, MI
- Contact:
Re: 3 axis router build
Couple of thoughts:
1) I'd extend those angles on the gantry uprights both up and down as much as you can. My gut is telling me that you'd get more stiffness benefit by moving them inboard a little and extending the lengths to overlap the Y-axis and your skate bearings than by keeping them as far apart as possible. You'll get a "hinge" type effect where they stop.
2) ACME rods need not be terribly expensive. At McMaster Carr you can by 6' of 3/8" rod for $30 (http://www.mcmaster.com/#general-purpos ... ds/=l9vcx8 ). Regular threaded rod works horribly when you go CNC and your hands will probably get tired from spinning the hand wheels to get the thing to move. The issue is that stepper motors are strongest at low speed and with such a high thread pitch, you can't spin the screws fast enough to get any reasonable speeds (you'll want to be able to cut at 150ipm or better - I sometimes cut at 400ipm) Better yet would be a multi start rod but they're about twice as expensive as the single start rod. (toward the bottom of the page: http://www.mcmaster.com/#acme-precision ... ws/=l9vauu )
3) With the bearings you're using and the design, you might not be able to get away with a single lead screw at the center of your axis. There are plenty of machines that size and bigger that use a single screw but, they're very solidly built and use profile rails for bearings. Most designs I've seen like yours use two lead screws to move the gantry, one at each end, and are either synchronized with a belt or by slaving an axis motor in the control software. With a not-so-rigid design, you can get significant racking on your machine with the screw only at the center that can stop your machine dead or lead to really poor cuts.
4) For anti backlash nuts, a quick search on Google will yield a bunch of results on several methods of making your own. The two most popular are to either make a tap from your leadscrew or to cut your nut in half and heat form it to the screw. Or, just go to dumpster CNC and buy some: http://www.dumpstercnc.com
And finally, just a comment that fixed gantry/moving table is the design used on the really high end routers - it's definitely the bomb setup if you have the shop space. There's also a guy on CNC zone that made a moving table type add on to his machine that moves the gantry and the add on table to extend his machines work envelope by like 4 feet or something. Very clever design!
PMoMC
-
- Posts: 640
- Joined: Thu Dec 27, 2012 4:28 pm
Re: 3 axis router build
I wonder about finding acme rod on ebay. sometimes the mcmaster prices can be a bit higher.
I do plan to brace those side plates quite a bit as well. I just haven't looked very closely at how I'll do that exactly. I've thought too about a dual lead screw on the x-axis but that's another thing that I can add later if I find it to be a significant issue. If I go with the acme rod, I'll likely just buy the anti-backlash assemblies.
I really appreciate the input from those who have been there!
- Andy Birko
- Posts: 125
- Joined: Fri Jan 06, 2012 5:02 pm
- Location: Rochester Hills, MI
- Contact:
Re: 3 axis router build
But now you have twice as many bearings to align.David King wrote: I bet it would run quieter and not wear out as quickly.
PMoMC