Shop tour
Shop tour
I have a basement workshop, but since my house is built on sloping ground, only half the basement is below grade. That means I have pretty good daylight, and convenient access from the outside. I am just putting the finishing touches on a new spray booth in an my garage, which is a separate building. It insulated, heated and well ventilated, so I can use it all year.
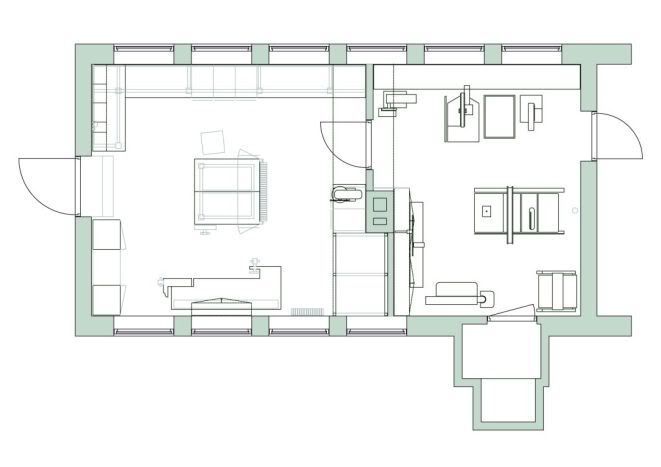
My workshop has evolved over the years, but about 3 years ago I did a major overhaul and built it into its current configuration. I used some elements from its predecessors, and based on my experiences from those drew up a plan with a machine and bench layout that suits my work style and tooling, and made efficient use of the available space.
The concept is one “clean” bench / assembly room, and one “dusty” machine / wood processing room (and now, the third room, for finishing). Actually there is one more, small room, connected to the machine room, which is where I keep my dust collector.
Here’s the plan
First, some snapshots from the bench room...
The main workbench. Whatever I’m working on is usually on the “island” bench, while plans, parts, jigs, glue-ups etc are kept on the bench along the wall. For one thing, I have better access that way, but it also eliminates the chance of tools dropping on it etc.
I sometimes work on different things on either side of the bench, as the large work surface allows it. The bench also acts as a clamp rack, and holds a cabinet with abrasives, sanding blocks etc. I also keep a large 230/115 V stepdown transformer, a shop vacuum, trash can etc under it, and the added weight makes it very stable.
A closer look at some of the stuff over the wall bench; all within easy reach from my usual position between the two benches.
This is my sharpening bench. I use water stones, hence the HPL countertop. The wall cabinets are for books, the little drawers for small parts and supplies.
I enjoy working with hand tools, and an ancient planing bench is great for some of those tasks. The clamshell type cabinet holds most of my bench planes and regular woodworking tools
I monitor and control RH closely
Wood storage
Bridge blanks, headplates etc
More storage; tuners, pickups, strap buttons and whatnot. I like to keep this stuff fairly well organized, so I don’t have to waste time looking for it.
Works in progress
Various routers, jigs etc
That was all in the bench room, here’s the machine room:
Two bandsaws (one 24”, the other 12”), in front of my stash of Honduras mahogany.
Table saw with home made router table, and drum sander in the background
Jointer and edge sander
-
- Posts: 46
- Joined: Fri Jan 06, 2012 5:32 pm
Re: Shop tour
I am both impressed and jealous.
-
- Posts: 5
- Joined: Mon Jan 30, 2012 5:57 pm
Re: Shop tour
Find looking shop. Be glad when I can bring mine back home.
Thomas
Thomas
-
- Posts: 3
- Joined: Thu Feb 02, 2012 1:09 pm
Re: Shop tour
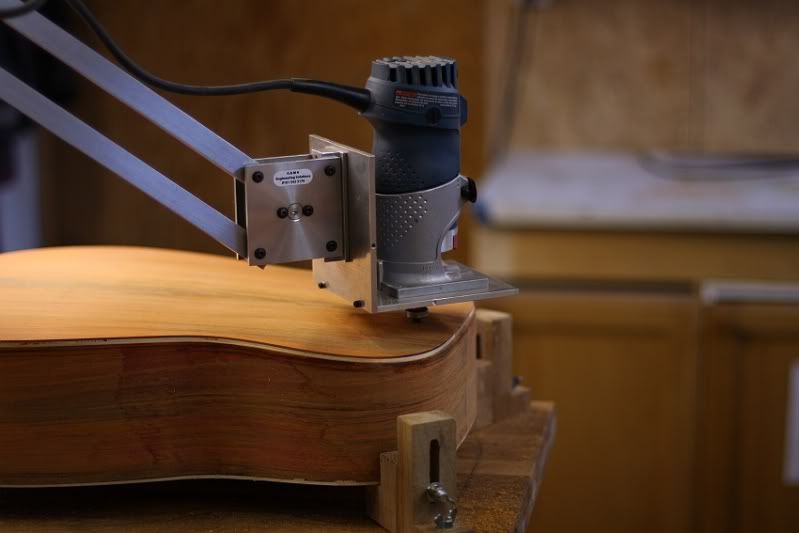
Arnt--that's a great-looking Fleishman-style binding jig.
Kevin
Kevin
- Bob Gramann
- Posts: 1111
- Joined: Fri Jan 06, 2012 11:08 am
- Location: Fredericksburg, VA
- Contact:
Re: Shop tour
I thought I had the best shop ever for a one-man operation. Yours is just like it only bigger and better. Real nice!
Re: Shop tour
There are only 12 of those in the world, I'm lucky enough to have one as well. It's a very fine tool indeed.Kevin Canney wrote:Arnt--that's a great-looking Fleishman-style binding jig.
Kevin
I always like seeing pictures of Arnt's shop. It's very well organaized, laid out and always looks inviting. I've gotten many ideas from Arnt over the years.
Tusen takk
The grass is always greener till you get to the other side...
- Waddy Thomson
- Posts: 270
- Joined: Fri Jan 06, 2012 8:11 pm
- Location: Charlotte, NC
Re: Shop tour
Me too, and it solved my binding issues.
-
- Posts: 1
- Joined: Fri Jan 13, 2012 11:35 pm
Re: Shop tour
Gosh, it's beautiful. And so organized. And not full of wood shavings...
(Also, the photos are great!)
-
- Posts: 120
- Joined: Sat Jan 07, 2012 3:05 pm
- Location: Lorette, Manitoba, Canada
- Contact:
Re: Shop tour
That's a LOT of chisels and planes to keep sharp! Good thing that you enjoy it.
I may be crazy...but I'm not insane.
-
- Posts: 153
- Joined: Fri Jan 06, 2012 8:54 pm
- Location: Orillia, Ontario, Canada
- Contact:
Re: Shop tour
Well organized shop Arnt. It may serve to inspire me to rethink my space and work at it this year.
-
- Posts: 78
- Joined: Sun Jan 08, 2012 4:59 pm
Re: Shop tour
I think this overwhelming tidyness is close to forbidden by norwegian law!
Hi Arnt - seriuosly impressive shop, - even moreso being for sparetime use.......
just a pity that you are 1000 km away...
Hi Arnt - seriuosly impressive shop, - even moreso being for sparetime use.......
just a pity that you are 1000 km away...
-
- Posts: 3
- Joined: Thu Feb 02, 2012 1:09 pm
Re: Shop tour
I was going to ask you if you had plans or a parts list, but if there are only 12 in the world, I guess they're going to be hard to come by. Can you tell me more about the jig?Rod True wrote:There are only 12 of those in the world, I'm lucky enough to have one as well. It's a very fine tool indeed.Kevin Canney wrote:Arnt--that's a great-looking Fleishman-style binding jig.
Kevin
I always like seeing pictures of Arnt's shop. It's very well organaized, laid out and always looks inviting. I've gotten many ideas from Arnt over the years.
Tusen takk
Re: Shop tour
The binding jig was made by Garry Hallam in the UK, and sold to a few of the folks who frequent the TLC forum. I guess the idea to build them came about in a discussion about Jim Olsen's binding jig over there, but several different designs and options were discussed, and I think he built a prototype a couple of years before that. I use the Stewmac cutter / bearing set with it, some folks use a spiral bit and an edge guide, with the router mounted on a lazy Susan type arrangement. Not much else to say, except it works flawlessly and I couldn't be happier. Thanks, Garry!
-
- Posts: 3
- Joined: Thu Feb 02, 2012 1:09 pm
Re: Shop tour
Wow--thanks for the detailed pictures, Arnt! I'm drooling. I wonder if Garry might be convinced to make a few more....
-
- Posts: 21
- Joined: Wed Feb 29, 2012 6:12 pm
Re: Shop tour
I have the prototype that Garry built and Arnt mentions in his postArnt Rian wrote:The binding jig was made by Garry Hallam in the UK, and sold to a few of the folks who frequent the TLC forum. I guess the idea to build them came about in a discussion about Jim Olsen's binding jig over there, but several different designs and options were discussed, and I think he built a prototype a couple of years before that. I use the Stewmac cutter / bearing set with it, some folks use a spiral bit and an edge guide, with the router mounted on a lazy Susan type arrangement. Not much else to say, except it works flawlessly and I couldn't be happier. Thanks, Garry!
Its a brilliant piece of kit as the others will testify to, Garry is a gifted and talented engineer!
Thanks Garry
Dave
-
- Posts: 8
- Joined: Sat Mar 24, 2012 1:05 am
- Location: Indiana
Re: Shop tour
Oh wow I am so a shamed of the space I have to work in after see this great shop.
-
- Posts: 609
- Joined: Sat Feb 18, 2012 2:03 am
Re: Shop tour
Phil,
Don't be.
Arnt is a pro.
Don't be.
Arnt is a pro.
-
- Posts: 275
- Joined: Fri Jan 06, 2012 1:35 pm
Re: Shop tour
Wow this is the diametric opposite of my shop! Though I think I've gathered some great ideas for when I finally remodel! I just don't want to invest too much time and money in case I have to move.
Great Pics Arnt, thanks for sharing!
-
- Posts: 55
- Joined: Sat Jan 07, 2012 6:23 pm
Re: Shop tour
Wow, this is so inspiring! I am remodeling right now and hence came across this in my research for layout and organization ideas- so glad I found this tonight!